
%401x.png)

As digital cameras have evolved over the years, wireless connectivity and large resolution are now the norms. Nearly all cameras now contain both manual and automatic modes with high-tech camera sensors that allow you to take professional-grade photos. Yet when it comes to 360º photos, despite the deployment of several auto-related advancements, nothing still compares to the quality that results from crafting photos by setting one’s camera’s dial. When taking 360º photos, you need to cover all surroundings by rotating your camera and maintaining a certain setting to achieve a seamless 360º photo when all the images are stitched together. If you take photos with an auto mode, the camera settings are ever-changing depending on the condition of the scene, such as the amount of light. This can cause stitch lines, the connection of two photos that appear unmatched and disconnected, hence why it is crucial to set the camera manually before taking photos.
There are 5 components you can set: ISO, Exposure, White Balance, Focus, and Aperture.
1) ISO
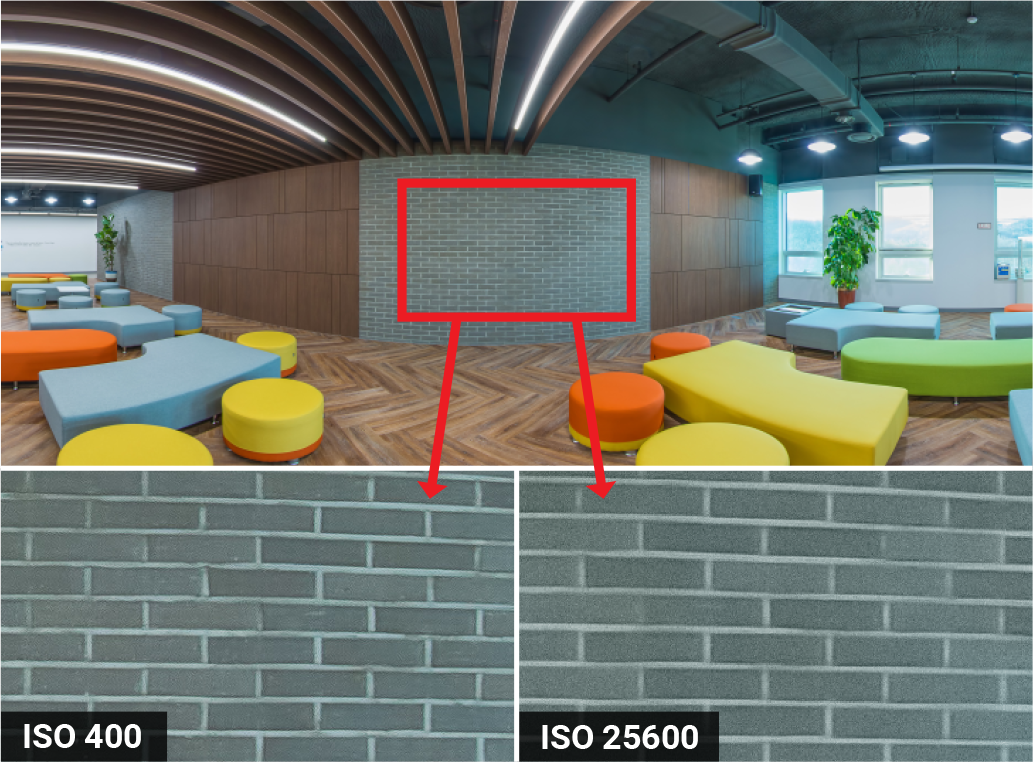
ISO determines the sensitivity of a CCD (Charge-Coupled Device) in a camera to light. If you set the camera to Auto mode, the camera automatically adjusts the ISO. However, if the Auto ISO has different exposure values for every photo then it can cause discontinuities in brightness across stitching images and can cause stitch lines. Therefore, you need to set it manually so the images can be stitched seamlessly. Every camera has a different range of ISO values (sometimes called ISO speed). A higher ISO allows for a faster exposure period which can reduce image blur and reduce shooting times in low-light environments. The drawback to increasing the ISO is that it makes the picture noisier causing the photo to appear grainy.
When is the right time to use low or high ISO? Using a low ISO value is recommended to reduce noise but if you need to reduce shutter time then ISO 1600 is the highest value recommended. When you are in a space with ample amount of light coming in, it is ideal to use a low ISO value as well as increasing ISO value if there is not enough light for the camera to capture.
2) Exposure
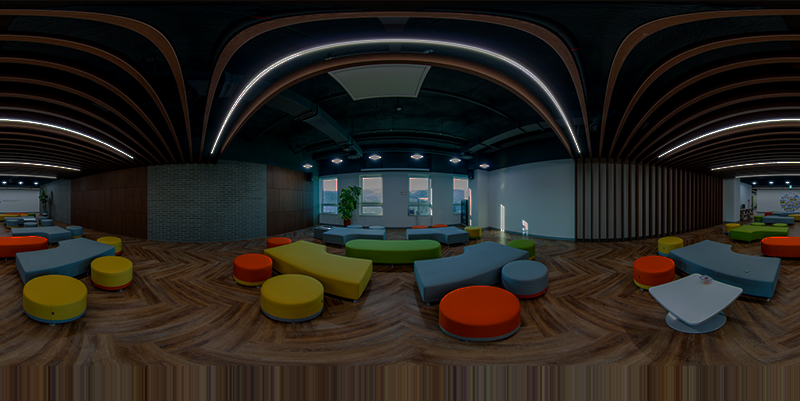
Usually dark and bright areas coexist in the same scene. You need to set your camera to the correct median exposure to balance the light or balance the lights and darks. If your median exposure is too dark, the brighter exposure is not going to be bright enough to capture all of the detail in the shadows. On the other hand, if your median exposure is too bright, your darker exposure is not dark enough to capture all details in the highlights. As a consequence, you get a washed-out image lacking in easily distinguishable details.
Set exposure with your back to the sun the sun when you take photos outdoors. When you take indoor photos, find a proper spot that has moderate lighting (not too bright or dark) and set the median exposure. Keep in mind that you must maintain the same exposure value while covering one 360º photo. If you suddenly change the value, it creates a stitching line between two photos when you stitched them together.
If a scene is too dark or bright, you can use bracketing methods which will be talked about in one of our future blog posts, or you can adjust the brightness in other programs such as Photoshop and Lightroom after stitching the photos. When you set the exposure, take several photos as a test to find the correct median exposure.
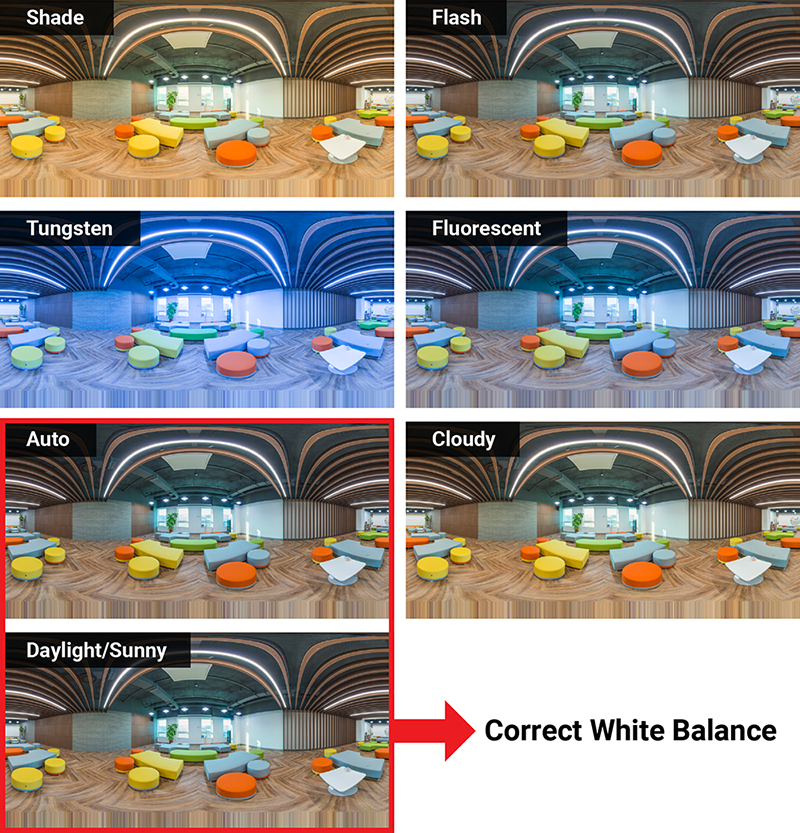
3) White Balance
After setting the exposure, set the white balance. The white balance affects the general color or temperature of the scene. Temperature ranges from the very cool light of a blue sky down to the very warm light of a candle. Many digital cameras have automatic and semi-automatic modes to help you make adjustments such as Auto, Tungsten, Fluorescent, Daylight/Sunny, Cloudy, Flash, and Shade mode. You can get an accurate result using the above presets but if you want to set your own white balance value, you need to manually adjust the white balance. Take one photo and then hold up a piece of white paper to your camera to tell it what color white is. For beginners, we suggest using auto mode when setting the white balance. To set manually, import the image to a post-processing software such as Photoshop or Lightroom and pick a spot using a white balance picker. The white balance will be automatically adjusted.
If you are not able to set the white balance, save the photos in RAW format and adjust it in other programs such as Photoshop, Lightroom or Capture One.
4) Focus
You need to anchor your camera focus to a certain distance. Before you set the focus, set the correct aperture that is one or two levels down from the maximum aperture size (F/8 is recommended). Once you’re done with this, the depth of field (DOF) called focus range or effective focus range will become deeper achieving a clear image as a result.
Setting the focus manually is essential to take 360º photos. If you set it in auto mode, the focus will keep changing at each angle which triggers errors when you stitch them to a 360º photo.
First, change the AF/MF switch to MF (manual focus). Next, turn the smaller focal ring all the way to the left, until you see the infinity symbol. That way you can set your lens to infinity mode and it helps you to obtain images with the same focus for every angle. To make it more accurate, you can take each photo with different angles, then compare the results on your PC to choose the best focus for the site.

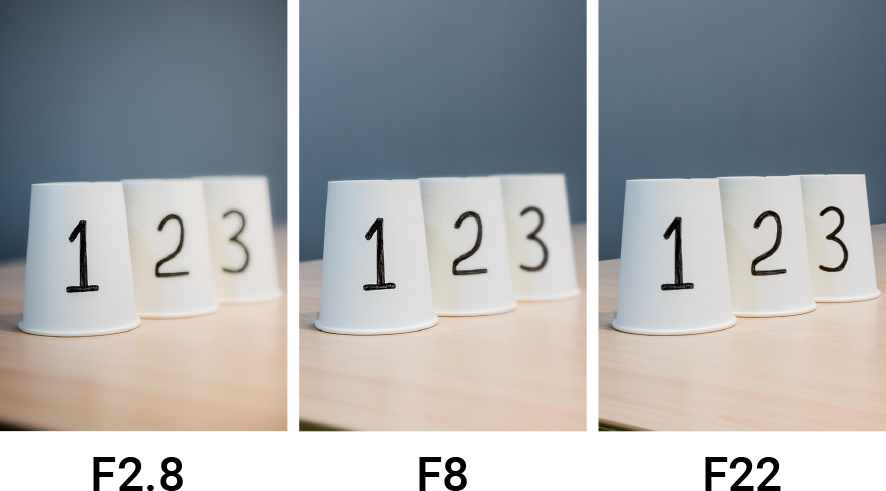
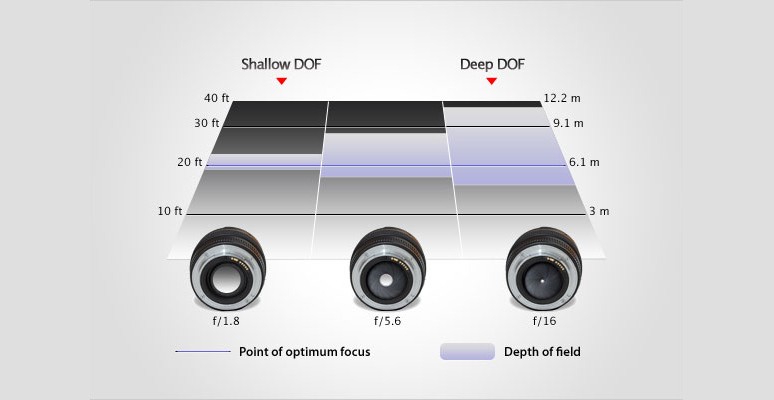
5) Aperture
Aperture is marked with an A on Nikon and Sony cameras, and AV on Canon. Aperture relates to the depth of field (DOF) which is the distance between the nearest and farthest objects in a scene. Simply put, DOF controls how much of the photo is in focus. With a change in aperture, you can manipulate the depth of field to your desired effect. For instance, if the aperture size is f/2 you get a blurred background of the image as the depth of field becomes shallow. When it comes to a 360º photo, you need to adjust the aperture to a higher number so that all objects in the scene are absolutely in focus. One or two level down from the maximum aperture value (small aperture means deeper DoF and wider focus) is recommended because the maximum value is not at their best at extreme aperture because the diffraction of light can cause a drop in sharpness and make your photo susceptible to long exposure noise and motion blur. For example, if the maximum aperture value of your camera is f/22, we recommend f/8 or f/11 to get the best quality image.
Tips when choosing a DSLR camera for 360º photo
- Choose a camera body that is compatible with various lenses and allows you to manually change camera settings.
- Choose a camera body that connects to a remote shutter release which helps you take photos stably.
